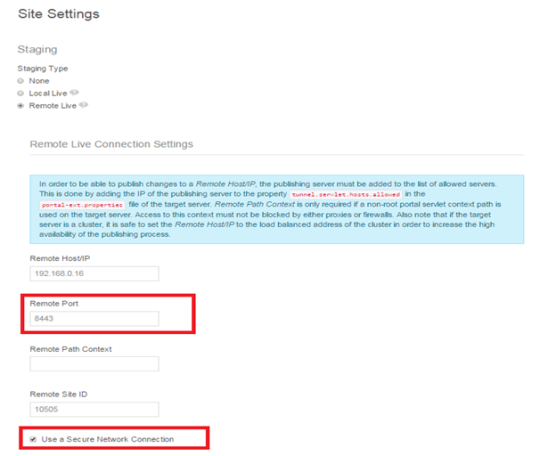
Tomcat could serve SSL content properly.
As an Http client, the JVM could accept a self-signed (untrusted) certificate. If you’ve ever come across a website that asked you if you want to accept an untrusted certificate, this is basically the same thing, but there’s no UI to import certificates into the JVM.
- Create a self-signed certificate using keytool. The following command generates a certificate keystore with one self-signed certificate inside it with filename keystore. I used the password “changeit”, but you can use whatever you want. Just make sure the Tomcat configuration uses the same.
keytool -genkey -alias tomcat -keyalg RSA -keystore keystore
- Configure Tomcat to use the certificate / keystore that we just generated. This tells Tomcat to send the certificate whenever you access the server @ https://host:8443. In server.xml look for the SSL connector:
<Connector port="8443" protocol="HTTP/1.1" SSLEnabled="true"
maxThreads="150" scheme="https" secure="true"
clientAuth="false" sslProtocol="TLS"
keystoreFile="/apps/…/tomcat/keystore"
 keystorePass="changeit" />
- Import the certificate into the JVM’skeystore. This tells the JVM that this is a “trusted” certificate so that whenLiferay makeshttps requests to Tomcat it will proceed without errors
- Export the key from the keystore you generated in step 1. This extracts the certificate so that you can import it into the JVM’s store
keytool -export -alias tomcat -keypass changeit  -file server.crt -keystore keystore
<pre>
- Import the cert into the JVM. “cacerts” is the filename of the JVM keystore. The path will be different on Windows (should be in %JAVA_HOME%/jre/lib/security/cacerts).
keytool -import -alias tomcat -file server.crt -keypass changeit -keystore JAVA_HOME/jre/lib/security/cacerts
- Check to see that the certificate was properly imported.
keytool -list -keypass changeit –keystoreJAVA_HOME/jre/lib/security/cacerts
portal-ext.properties settings
##
## Web Server
##

    #
    # Set the preferred protocol.
    #
    #web.server.protocol=http
     web.server.protocol=https


##
## Session
##

    #
    # Set this to true to invalidate the session when a user logs into the
    # portal. This helps prevents phishing. Set this to false if you need the
    # guest user and the authenticated user to have the same session.
    #
    # Set this to false if the property "company.security.auth.requires.https"
    # is set to true and you want to maintain the same credentials across HTTP
    # and HTTPS sessions.
    #
    #session.enable.phishing.protection=true
    session.enable.phishing.protection=false


    #
    # Set this shared secret to secure communications from one portal to another
    # via the tunneling servlet. This portal will refuse communications from
    # other portals that do not share the same secret.
    #
    # Secrets must be 16, 32, or 64 characters long.
    #
   tunneling.servlet.shared.secret=1234567890123456


##
## Tunnel Servlet
##
    #
    # See the properties "main.servlet.hosts.allowed" and
    # "main.servlet.https.required" on how to protect this servlet.
    #
    tunnel.servlet.hosts.allowed=127.0.0.1,SERVER_IP,192.168.0.16
    tunnel.servlet.https.required=true

##
## Axis Servlet
##
    #
    # See the properties "main.servlet.hosts.allowed" and
    # "main.servlet.https.required" on how to protect this servlet.
    #
        axis.servlet.hosts.allowed=127.0.0.1,SERVER_IP,192.168.0.16
        axis.servlet.https.required=true

#
# TunnelingServletAuthVerifier
    #
    #auth.verifier.TunnelingServletAuthVerifier.hosts.allowed=255.255.255.255
    auth.verifier.TunnelingServletAuthVerifier.hosts.allowed=
Once setting is completed please start the server

Comments on: "Liferay Remote Staging through HTTPS" (1)
[…] https://rajeevalochanabr.wordpress.com/2014/12/14/liferay-remote-staging-through-https/ […]