Blog about Liferay development, Portal and System administration solutions.

Archive for December, 2014

Liferay Remote Staging through HTTPS

Tomcat could serve SSL content properly.

As an Http client, the JVM could accept a self-signed (untrusted) certificate. If you’ve ever come across a website that asked you if you want to accept an untrusted certificate, this is basically the same thing, but there’s no UI to import certificates into the JVM.

  • Create a self-signed certificate using keytool. The following command generates a certificate keystore with one self-signed certificate inside it with filename keystore. I used the password “changeit”, but you can use whatever you want. Just make sure the Tomcat configuration uses the same.

keytool -genkey -alias tomcat -keyalg RSA -keystore keystore 


  • Configure Tomcat to use the certificate / keystore that we just generated. This tells Tomcat to send the certificate whenever you access the server @ https://host:8443. In server.xml look for the SSL connector:

<Connector port="8443" protocol="HTTP/1.1" SSLEnabled="true"  
maxThreads="150" scheme="https" secure="true"  
clientAuth="false" sslProtocol="TLS"    
keystoreFile="/apps/…/tomcat/keystore"   
 keystorePass="changeit" />


  • Import the certificate into the JVM’skeystore. This tells the JVM that this is a “trusted” certificate so that whenLiferay makeshttps requests to Tomcat it will proceed without errors
    • Export the key from the keystore you generated in step 1. This extracts the certificate so that you can import it into the JVM’s store
keytool -export -alias tomcat -keypass changeit  -file server.crt -keystore keystore
<pre>
  •  Import the cert into the JVM. “cacerts” is the filename of the JVM keystore. The path will be different on Windows (should be in %JAVA_HOME%/jre/lib/security/cacerts).


keytool -import -alias tomcat -file server.crt -keypass changeit -keystore JAVA_HOME/jre/lib/security/cacerts


  • Check to see that the certificate was properly imported.
keytool -list -keypass changeit –keystoreJAVA_HOME/jre/lib/security/cacerts


portal-ext.properties settings


##
## Web Server
##

    #
    # Set the preferred protocol.
    #
    #web.server.protocol=http
     web.server.protocol=https


##
## Session
##

    #
    # Set this to true to invalidate the session when a user logs into the
    # portal. This helps prevents phishing. Set this to false if you need the
    # guest user and the authenticated user to have the same session.
    #
    # Set this to false if the property "company.security.auth.requires.https"
    # is set to true and you want to maintain the same credentials across HTTP
    # and HTTPS sessions.
    #
    #session.enable.phishing.protection=true
    session.enable.phishing.protection=false

    
    #
    # Set this shared secret to secure communications from one portal to another
    # via the tunneling servlet. This portal will refuse communications from
    # other portals that do not share the same secret.
    #
    # Secrets must be 16, 32, or 64 characters long.
    #
   tunneling.servlet.shared.secret=1234567890123456


##
## Tunnel Servlet
##
    #
    # See the properties "main.servlet.hosts.allowed" and
    # "main.servlet.https.required" on how to protect this servlet.
    #
    tunnel.servlet.hosts.allowed=127.0.0.1,SERVER_IP,192.168.0.16
    tunnel.servlet.https.required=true
    
##
## Axis Servlet
##
    #
    # See the properties "main.servlet.hosts.allowed" and
    # "main.servlet.https.required" on how to protect this servlet.
    #
        axis.servlet.hosts.allowed=127.0.0.1,SERVER_IP,192.168.0.16
        axis.servlet.https.required=true
    
#
# TunnelingServletAuthVerifier
    #
    #auth.verifier.TunnelingServletAuthVerifier.hosts.allowed=255.255.255.255
    auth.verifier.TunnelingServletAuthVerifier.hosts.allowed=


Once setting is completed please start the server
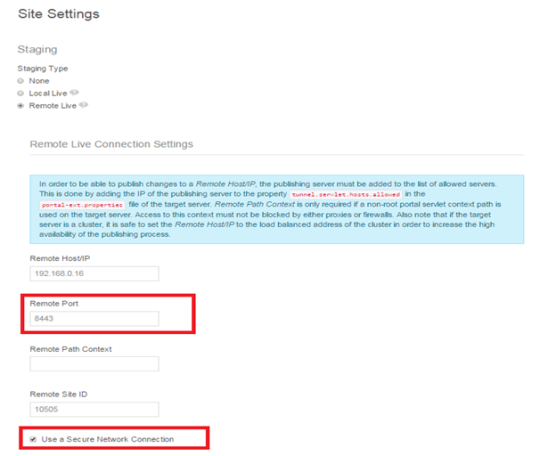
Remote Staging

Liferay Remote Staging through HTTP

Liferay provides two different ways to setup the staging

  1. Local Live

When Local staging is enabled then clone is created as site pages containing the content and portlet data. Original site becomes live and clone will become staging environment.

      2. Remote Live

When Remote staging is enabled then there will an establishment of connection between current site and site on remote Liferay server. Remote site becomes live environment and current site becomes staging environment.

Remote Live Staging

When you enable Remote Live staging, the remote site becomes the live environment and the current site becomes the staging environment. The remote (live) Liferay server and the local (staging) Liferay server should be completely separate systems. They should not, for example, share the same the database. When Remote Live staging is enabled, all the necessary information is transferred over the network connecting the two servers.

Before a site administrator can enable Remote Live staging for a site, the remote Liferay server must be added to the current Liferay server’s list of allowed servers. The current Liferay server must also be added to the remote Liferay server’s list of allowed servers. You also need to specify an authentication key to be shared by your current and your remote server and enable each Liferay server’s tunneling servlet authentication verifier. You can make all of these configurations in your Liferay servers’ portal-ext.properties files. Your first step should be to add the following lines to your current Liferay server’s portal-ext.properties file:


Steps need to be followed:

  • add below mentioned properties to current Liferay server’s portal-ext.properties file:

##
##Staging Server setting        
##
    # Set this shared secret to secure communications from one portal to another
    # via the tunneling servlet. This portal will refuse communications from
    # other portals that do not share the same secret.
    #
    # Secrets must be 16, 32, or 64 characters long.
    #
tunneling.servlet.shared.secret=1234567890123456

##
## Tunnel Servlet
##
    #
    # See the properties "main.servlet.hosts.allowed" and
    # "main.servlet.https.required" on how to protect this servlet.
    #
    tunnel.servlet.hosts.allowed=127.0.0.1,SERVER_IP,192.168.0.16
    
##
## Axis Servlet
##
    #
    # See the properties "main.servlet.hosts.allowed" and
    # "main.servlet.https.required" on how to protect this servlet.
    #
    axis.servlet.hosts.allowed=127.0.0.1,SERVER_IP, 192.168.0.16
    
#
# TunnelingServletAuthVerifier
#   
auth.verifier.TunnelingServletAuthVerifier.hosts.allowed=

  • Same settings need to be replicate in both thenodes (Liferay node1 and node2).
  • Restart both Servers.

Liferay’s use of a pre-shared key between your staging and production environments helps secure the remote publication process. It also removes the need to send the publishing user’s password to the remote server for web service authentication. Using a pre-shared key allows Liferay to create an authorization context (permission checker) from the provided email address, screen name, or user ID without the user’s password. You can specify any value for the tunneling.servlet.shared.secret property; the value for your current server just has to match the value of your remote server. Remember to restart both Liferay servers after making these portal properties updates. After restarting, log back in to your local Liferay portal instance as a site administrator. Then navigate to the Site Administration → Configuration page for your site. Next, click on Site Settings in the left menu and then on Staging listed under the advanced tab. Select Remote Live under Staging Type and additional options appear.